Support
- Intro
- Inspectors
- Print Industry
- Brand & Print Buyers
- Color Manufacturing
- Design & Photography
- CC Products
- Tests & Audits
- Trainings
-
Training Overview
-
Knowledge related to Color and Measurements
- Standard CIE Illuminants
- Color Difference Formulas
- Realistic ∆E values
- Color Measurements
- Maturity of Color Definition
- Spectrophotometer vs Colorimeter
- Instrument Geometry
- Metamerism, Color Inconstancy Index
- Metamerism in practice
- Aperture • Screen Ruling • Patch Size
- Scan mode: Understanding of Aperture, Patch Width, Scanning Speed relationship
- Understanding variation
- Measurement Backing
- Understanding SCCA
- Fix the Lighting Condition first
- Second step: standarize your Display
- Create spectral Color Standard (multi M-conditions)
- Define a Tolerance
- Color Specifications and Measurement Conditions
- Color Knowledge Database - 3rd party resources
- OBAs
- When ∆E might be not enough
- Global Color Inspector Preferences
- Custom Illuminant
- Designer's Guide
-
Spot Ink formula in the production chain
- Guide for Color Experts ( CC Champions)
-
ISO Standards
Custom Illuminant
To create Custom Illuminant, there are two simple steps:
- Measure Custom Lighting with CC Capture Lighting Inspector - or Measure Lighting with CC Display. Both applications can be used with KonicaMinolta Myiro-1 or Xrite i1Pro. A dedicated diffuser is required. Save the measurement
- Go to Global Preferences and select Custom 1 (C1) or/and Custom 2 (C2) lighting conditions pointing to any measurements already stored in Lighting Inspector.
Done!
Now, any time you measure color samples in QuickChecker or analyze samples selected from the assets, calculations based on custom lighting are listed.
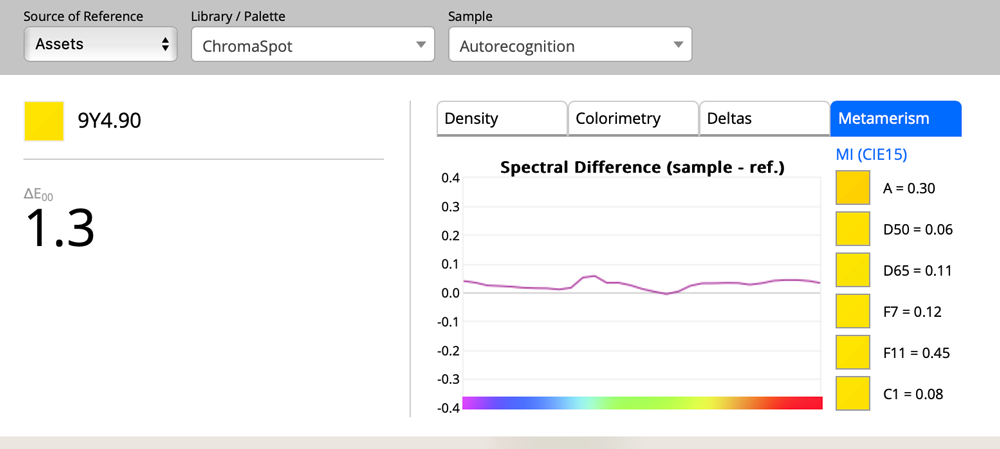
Metamerism index - let last Lighting C1 = Custom 1
Custom Color Specification
You may also need to go deeper and create a Custom Color Specification that is based on Custom Illuminant. Learn more here.
Custom Illuminat selected for the new Color Specification 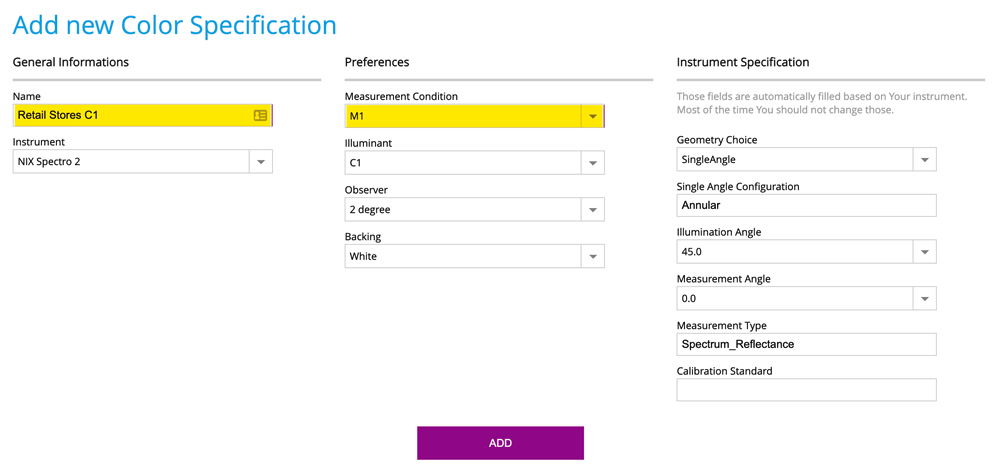
Once Custom Color Specification (instrument related) is defined, the Operator can select it from the top menu.
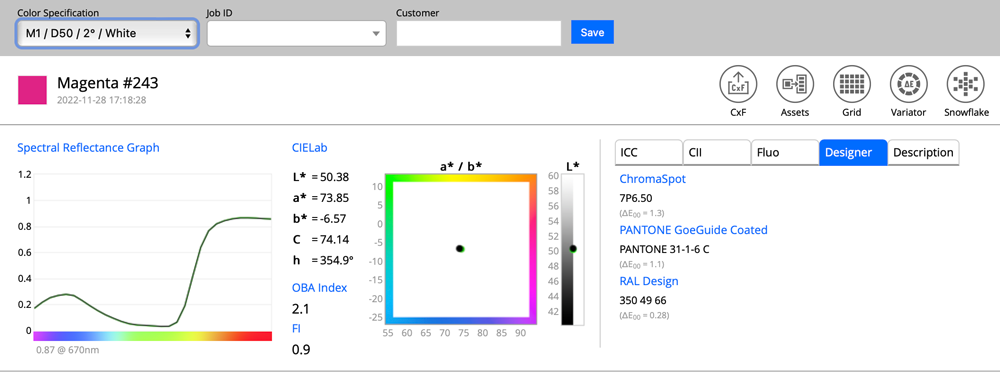
Sample @ [ M1 / D50 / 2° / White ]
Same sample @ [ M1 / C1 / 2° / White ] where C1 = Custom Lighting Condition 1
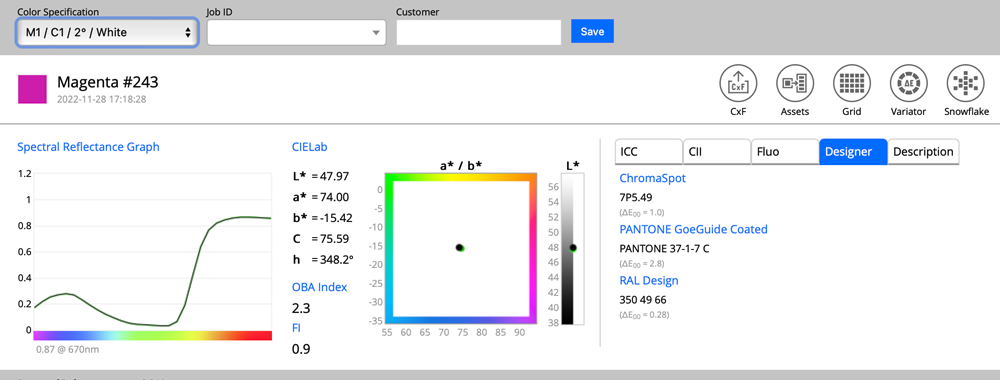
We can see that the Lab coordinates are different, but the spectral curve is the same. This is a single measurement; only a report is adopted to the currently selected Color Specification.
Contact ChromaChecker Support
Additional information and Support Form is available for logged users.