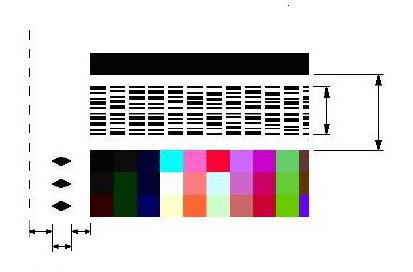
iSis barcodes
Xrite Isis has a built in barcode reader. This device requires very specific barcodes that contain all required by SDK information.
To use barcodes a dedicated chart has to be generated. There is no way to use an existing chart and add barcodes to it - requirements change the geometry of the chart layout!

Please note that geometry is very specific - for more info consult Xrite i1iSis Chart Design Guideline / section 4 ChromaChecker require schema: RRCCXXYYAAAAAAA..*NNNN
Please note that iSis uses Code39, but all characters must be formatted to a specific exact size, rotated 90 degrees, two of them in a single row, with a checksum at the end... . This is very complex to prepare working barcodes manually.
How to use iSis barcodes with CC Capture
1. Generate Chart with i1Profiler
The easiest way is to use i1Profiler to generate a valid chart that has all key parameters set properly.
2. Replace barcode with another using Image Editor (Photoshop, Illustrator, InDesign, ...)
This procedure is optional. The user may generate chart with i1Profiler then replace barcode with another but the user has to be sure that chart has:
- exactly same number of columns and rows,
- unchanged patch sizes.
ChromaChecker requires a unique code for each printer/track combination. Valid barcodes are available for download - but not the full chart - barcodes only. The users may want to replace it to recognize various substrates (tracks) and/or differentiate measurements from various printers.
Caution:
- Please note that positioning is left-side aligned. Take care not to change the scale.
- When saving don't assign ICC Profile - keep the file untagged.
3. Apply aliases for existing 3-rd party charts.
Some users have already 3rd party systems with existing barcode charts - CC Capture can read barcode content that can be copied and aliased - CC Capture can support them.
PDFs
Video
-
This tutorial covers the use of Chromachecker Capture to operate an x-Rite iSis spectrophotometer.
-
This tutorial shows how to use a barcode to automatically select the print condition and printing device that was used to produce the output being read by the iSis spectrophotometer. This automates the process of a quality check to simply placing the leading edge of the output in the iSis instrument to start the identification of the file and scanning of the control strip.
-
This tutorial provides an overview of how to perform a mechanical check for the iSis spectrophotometer scanner. By using Instrument Inspector you can confirm that the iSis is performing within the specification of the device. If you receive a fail at any time, it is a best practice to review this basic maintanence.
Related Topics
Contact ChromaChecker Support
Additional information and Support Form is available for logged users.